5 Tips for Great Cat Photography
We all love photographing our cats, whether portrait shots of cats in a sun puddle or action shots as our cats leap for their latest toy. Regardless of what type of equipment you are using, whether you are shooting cat photos with a DSLR or your phone, we’ve got five great tips for you on how to create great cat photography, written and photographed by Pets-Kids Photography LLC.

In general, pets are tougher to photograph than people. Who can blame the furry babies for not being used to the bright flash or not wanting to accept direction from the photographer? You can tell people, “Chin up, look this way, hold that pose…!” Try those commands on a cat!
Show dogs and show cats may be more accustomed to people and direction, but for most animals, being photographed is a new experience.
TIP #1 Be prepared to shoot lots of images!
Make sure that your memory card has plenty of room. Because cats will move around and not easily stay still for that “money shot”, snap away. In fact, use rapid fire shooting or put your camera in continuous shooting mode. Later you can evaluate your images on a bigger screen (for example, your computer) and review each one.
Also it is hard to evaluate an image by just looking at your camera screen. Immediately after taking a shot, it is convenient to be able to quickly view the images on your camera and do a quick check on lighting and focus. Many times an image that appears in focus on your camera is not actually that sharp when you view on your computer. This is important especially if you want to enlarge the image.
By taking lots of pictures through rapid fire shooting, you have plenty of images to choose from and can always delete the ones you do not like.
TIP #2 Present a solid background so that your cat can stand out in the picture.
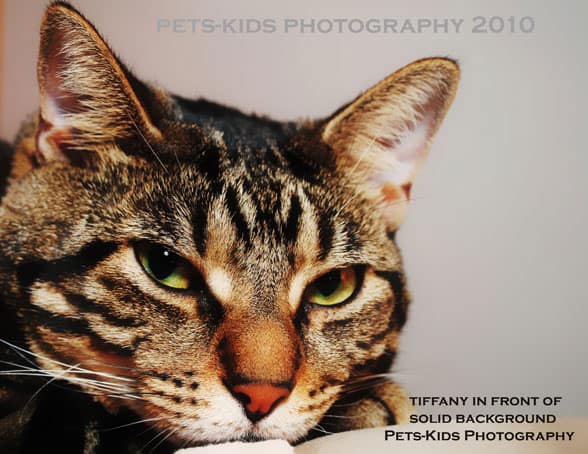
You can still achieve a clean, studio-looking shot taken in your own home. Before taking a picture of your cat, evaluate the areas of your house where the cat likes to be in.
Also choose a place where the background is clean and with minimal things (for example, just one vase or one, big plant).
I would suggest taking out everything that is behind the cat. Take out the newspapers on the floor or the shopping bags lying around. Look at corners of your house where the solid walls make a nice backdrop.
Once you identify the spots for photographing, place your cat in that desired spot.
If your cat will not follow your direction, try placing the pet bed or favorite blanket there.
If that still does not make the cat pose, put a little catnip on the pet bed. Caution about the amount of catnip because unless you want the cat to be playful and active during the shot, the catnip will get the cat lively. (PS Action shots are just as wonderful as posed, still shots.)
If you are a big cat lover like me, you will want to take photos of your feline baby in different poses and actions!
Using patterns effectively in the background
If you do want to include patterns in the background (i.e. from a pillow or from the curtains), keep a distance (10 feet or more) between the cat and the background in order to blur the background images.
You want to blur the background to minimize distractions that will compete with your subject.
TIP #3 Light or Dark Background?
Consider the color of your background compared to the color of your cat.
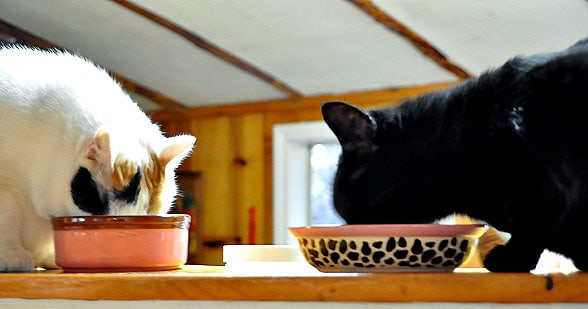
For example, if your cat is light-colored, a dark background will provide strong contrast for your picture.
Conversely if your cat is darker colored, choosing a light background is a good choice. This is a simplified way of choosing a background.
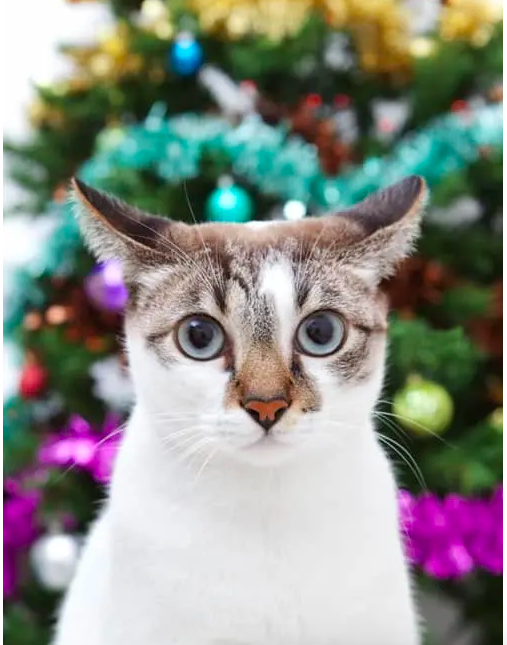
For the novice photographer/animal lover, I would suggest choosing a light background which will work for most animals. If your cat is white (like the beautiful Fancy Feast model), then avoid a white background but beige and any other color is fine.
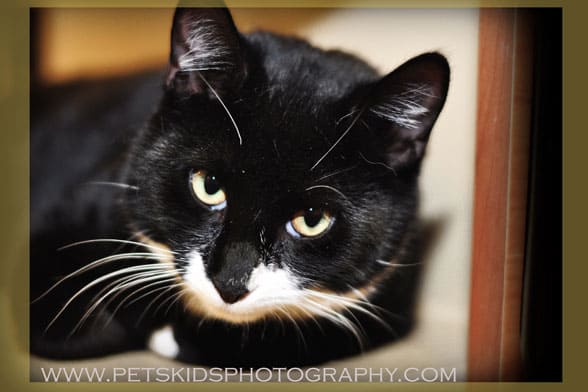
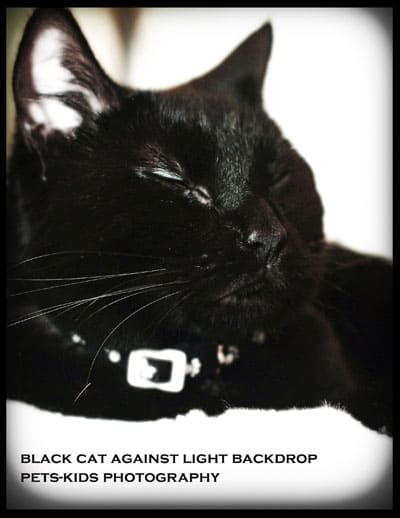
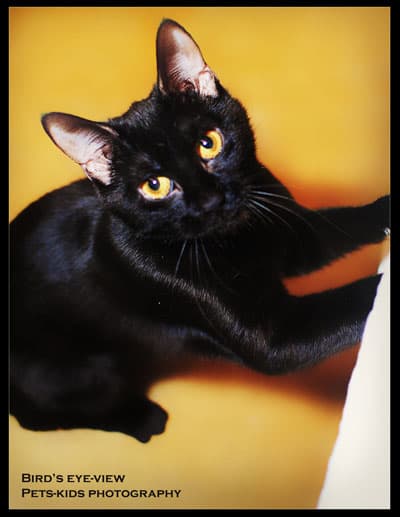
If you have a black cat (I love black cats!), you definitely need a lighter background because the details of the black animal will fade.
TIP #4 Photograph Indoors and Outdoors Using Natural Light.
Photographing indoors may require flash or additional lighting.
I prefer to photograph either with an off-camera flash (flash not directly pointed at the subject which gives a harsh look similar to the driver’s license photo which we all fear!) or using natural lighting.
Evaluate the lighting inside your house. What time of the day gives which area of the house sunlight? If you have a pet bed set-up by the window, that is a good place to photograph.
Have your cat face the window to softly highlight your cat’s features (i.e. the eyes will glimmer).
As the photographer, you want to stand with your back to the window. Do not photograph facing the window because this will cause your subject to look in silhouette, or the flash will be triggered and the soft, natural light effect will not be achieved.
When shooting outdoors, take pictures either early in the day or before sunset.
Outdoor shooting for cats is limited to those who have a backyard or to those who let their cat out. I never let my cat out and do not believe that letting cats roam around the neighborhood is safe and best practice (fast cars, eating random garbage, risk of being picked up by animal control, being attacked by stray animals).
Shooting outdoors can be challenging if the sun is causing your cat to be overheated or if the sun is too bright. Have you taken photos of subjects in bright sunlight, and they are squinting or looking washed out?
By taking pictures early in the morning or late in the day before the bright sunlight, your subjects will look better.
If you are photographing outdoors in bright sunlight (i.e. during noontime), place your pet in a shaded area such as under a tree or under an awning of a building. If photographing in a shaded area, flash use will add the necessary lighting to your pet’s picture to enhance lighting in that situation.
TIP #5 Take pictures using different viewpoints.
Start by taking images with your cat directly in front of you.
A rule of thumb for photographing animals and children is to get the camera to their eye level. As the photographer, you need to bend, squat or sit on the floor for this pose.
While posing your pet directly in front of your camera gets you a nice picture, try photographing your pet’s profile.
By positioning yourself above the pet (maybe the pet is sitting down and you are photographing standing up), you get a different viewpoint of the pet.
Conversely by placing your pet above the camera (the pet is sitting on a chair or on a raised platform and you are sitting on the floor pointing the camera up at the pet), your subject will appear to have a grand pose.
Pets are part of the family. Pets grow up so fast! The pictures you take will give you memories that will last a lifetime!
About the Author: Pets-Kids Photography LLC (West New York, NJ) specializes in pet photography with modern art infusion. Whether it is a family or pets or a family or kids, Pets-Kids Photography celebrates today’s modern definition of family. Pets-Kids Photography donates pictures of adoptable pets on behalf of local animal rescue groups.
Photos courtesy Pets-Kids Photography
First published in CatTipper in 2012.
- Indoor vs. Outdoor Cats: 5 Reasons to Keep Your Cat Indoors - April 22, 2020
- 5 Tips for Great Cat Photography - April 18, 2020
- 5 Feng Shui tips for your home and cats - April 15, 2020